Here’s a thought for you as you compose your photographs in the field and then process them in the digital darkroom…work to have quiet borders in your images. Quiet borders is something that’s subtle, but can have a profound impact on how the subject, and your story, is conveyed to the viewer. Anyone who has been in an image review with me knows that I am a stickler for this and stress how important it is, almost to a fault, where people get tired of me saying it. :-) It can be a lot of work, and some may feel it is unnecessary or overly anal, but I ask you to have an open mind and perhaps give it a try.
Teaching in the field, I talk about scanning the edges of the composition before you press the shutter button, looking for things that are protruding in to the frame, or more subtly, don’t add to the composition. The point of this work is to eliminate or minimize the visual information in the composition that could detract from the feeling or story you are trying to capture. Removing distractions (visual noise) will help your image be stronger and convey a better, clearer message to the viewer. Often when I look through folks viewfinders to provide some feedback on the comp, I end up pointing out things around the border of the composition. I can read folks reactions and at first they are thinking “but what about my subject and how the shot looks”, then they pause and consider what I’m saying. More often than not I hear a response that sounds something like “I didn’t even see that”. And that’s my point, taking the time to scan the entire composition, remove distracting elements and then taking the shot.
As I’m photographing for myself, I work to frame up the subject, not perfectly at this point, but very close to the final position. I then turn my attention away from the subject and start to examine every other part of the composition, paying particular attention to the edges of the frame. I look for things that don’t add to the story I’m trying to tell or that may grab the viewers eye away from the main subject/story. I then do a quick study of the visual weight, flow and balance of the image. From that review, I often recompose slightly to minimize distractions (or make a mental note for later processing) which will make a stronger photograph in the end.
I have done a moderate amount of study on the topic of visual perception and how we process visual information. It can be a fascinating subject for those so inclined to know more about how we visually process the world around us! My point in mentioning this is that a lot of the basis for my comments in this post are rooted in the science of how we process information, which artistically leads to how we interpret what we see…meaning does the photograph convey the story I’m trying to tell and will people be able to interpret the visual information in the photograph to hear what I’m trying to say.
Quiet Borders
Back to the title of this post and having quiet borders in your compositions. In the majority of photographs, the subject is towards the  physical center of the composition. Yes? If you think about the rule of thirds and where the third lines intersect, the subject will typically be in this vicinity. On rare occasions the subject will be towards the borders, but those are very exceptional situations and rare, so I’m going to discount those for the sake of this discussion. This may be an obvious statement, but our goal/desire is to have viewers look at the subject, or at a location in the image, and then take away what we are trying to impart to them (story, emotion, wonder, etc) So our goal as photographers is to craft the image to maximize the chances that the viewer will look where we want them to look and see what we want them to see. We do this using various tools; Composition, visual balance, lights/darks, leading lines, color/tonal balances, etc. We also can employ tools to control exactly what is being shown so that our message can come through clearer, with fewer distractions. Have you ever listened to someone telling a story and they are using so many words that you start to lose focus, become impatient, or just bored? Well, the same is true with visual communication in photography. We can overwhelm or cause impatience if a viewer isn’t sure what they are seeing and what we want them to come away with. If we choose our “words” carefully, avoid “words” that do not build/benefit the story, our listener will be more engaged with what we are trying to say.
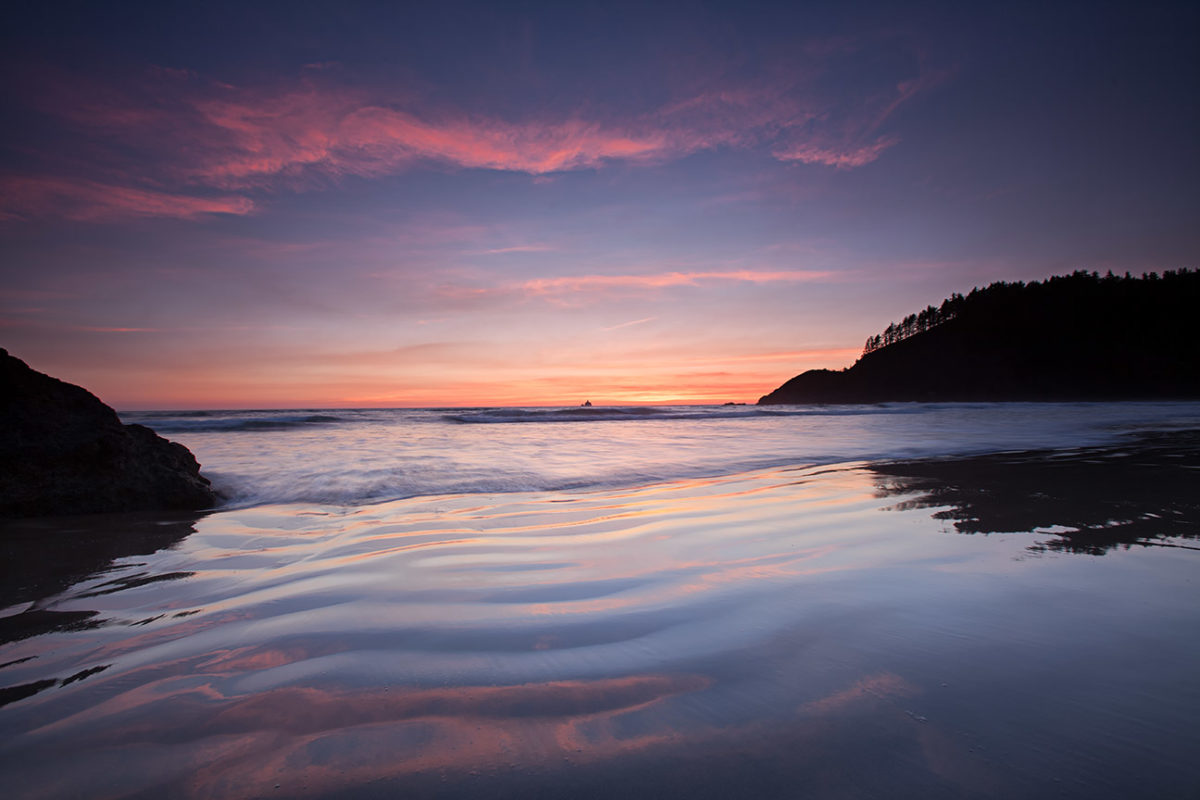
Having quiet borders is one of the most important aspects for folks to focus on your subject, located towards the center of the composition and is the one message I hope you take away from this post. Removing or minimizing any distracting elements on the borders will help free up the viewers mind to focus on what you want them to focus on. AND, having things on the borders that could pull attention, also means that it’s easier for the viewers eyes to leave the frame since they are “headed” towards the edge because of the distraction. Picture this with me if you will…have you ever viewed a nice photograph of a waterfall or some other obvious subject in the center of the image. Now, imagine there are several bright spots towards the edges of the frame, maybe from reflected sunlight. As viewers we consciously won’t acknowledge the bright spots as they are part of the overall scene. However, subconsciously, our minds attention will keep being drawn to the bright spots, which will diminish our ability to fully appreciate the subject or story towards the center of the frame. We know, with scientific fact, that our eyes are drawn towards the brightest part of a scene, so it stands to reason that any bright spot has a chance to draw our attention. We want our viewers focused towards the center of the frame, where our subject is, and not have the eyes and mind being drawn to “un-important” areas of the photograph.
Similarly to bright spots, if there are items in the frame around the border that can’t be quickly understood and discarded by the viewer, that too will distract from the subject and story. Have you ever puzzled over something, trying to figure out what your seeing? The same holds true for small objects in photographs that are not easily interpreted/understood. Our conscious, or sub-conscious mind will puzzle over them until it figures out what it is. Often times viewers are not aware of this going on, but it does, we’re hardwired for it.
Visual Communication
Since photography is essentially visual communication, I often think about my photography in communication terms and thus practice “good communication” skills. We’ve all learned how to communicate effectively….clear subject, introduction, supporting information, conclusion, etc. Or even creative story writing where we spin tales, working to transport the viewer in to the scene and have them come along the journey. Many of the same principles can be applied to photography since it is a form of communication. Have a clear subject. Check. Guide the viewer to where we want them to look by using leading lines/tonality/color. Check. No fragmented thoughts or non-supporting information. Check. Crafting a photographic composition is very similar to crafting a presentation or short story and I often approach photography like this, looking at all aspects of the composition, not just the subject. At the core, I strive to create the clearest, best articulated message I can in my photographs. One of the ways to do this is to remove any unnecessary words/objects, or things that can distract the viewer. I do this through artful composition in the main body of the image, moving my feet and adjusting focal lengths to craft a comp that minimizes distractions. Then in Post, I spend a big chunk of time cleaning up the visual language that I couldn’t eliminate in the field.
Post Processing
Once you’ve trained your brain to see distracting elements in the field so you can work to eliminate them. Now comes another bit of training, to see, really see, distracting elements in your digital darkroom. For some, this proves to be a bit more challenging. My theory is that in Post, we are so focused on the subject, tonality, color, lighting and just the vast array of tools that we overlook so many small details in the image that could be cleaned up to reduce visual noise and distractions. If people thought I was anal in image reviews, I’m even more a stickler in the darkroom for cleaning up an image and creating quiet borders so the subject/story can clearly shine through. I probably spend more time cleaning up an image and creating quiet borders than I do actually processing the rest of the image! I’m of the belief that a good foundation, a good starting point, is so important for a great final output.
 I will typically start my processing in Lightroom, applying some global edits such as White Balance, maybe a little cropping, some texture, etc. I quickly though move the image to Photoshop, which is where I do the bulk of my edits. I recognize LR has come a long way and is a good editor these days and I don’t want to diminish it’s value. However, when it comes to cleaning up an image, it still lags way behind PS in my opinion. The content aware engine in PS and fine control of tools haven’t been matched elsewhere, so that’s why I choose to move my editing to PS (and the use of more advanced plug-ins, layers, etc) The first step in my workflow when I get in to PS is to spend time cleaning up anything that will distract the eye from what and where I want people to look. Of course there are the obvious things like sticks and rocks and seagulls that can be easily eliminated and most people do this….and also typically stop here. What I do is spend time looking for any little fleck of brightness, or change in tonality, that may grab the viewers eyes and attention away from where I want them to look. I first scan the image in its entirety, looking for anything that catches my eye. Errant leaves, pine needles, reflective surfaces, etc. What helps is if I slightly blur my vision and don’t focus on any one spot in the image. Soften the vision and be acutely aware of what things stand out visually. I do this across the entire image, but I also pay particular attention to areas away from my subject/story, which is typically around the edges, with the goal to create visually quiet borders. Once you’ve identified these spots, then you can make a judgement on whether to remove or not.
At this point, some of you may be saying “but it’s part of the scene and you should leave it in. It’s the way it was”. There is some truth to that, but I will ask in return, “are we making documentary photographs, depicting exactly what is there, or are we making more artistic images?” If the answer is “documentary”, then by all means leave everything in, AND, do not process the image at all. Don’t even use the jpeg from the camera, which is processed. Full RAW!! :-) If we are making “artistic” images, then you as the artist can decide how realistic you want the image to be and what to leave in or remove.
Doing clean-up as a first step helps me immensly in the rest of my processing. It lets me focus on my subject, the color, tonality, texture of the image and not be distracted or visually interrupted by errant sticks or bright spots. Once I complete the clean-up, which can sometimes take quite a while, I then move on to processing the clean image. What I find particularly funny is that no matter how focused and attentive I am during the clean-up, I typically find other things that need cleaning as I’m moving through my processing steps! I think to myself, “I thought I did so good, I can’t believe how I could have missed this”. Which goes to show, that even with a lot of practice and training for myself, I still don’t “see” some things during the first or second passes through an image. It shows how it’s easy to “miss” things in the field…even in the comfort of my home, I still end up missing things. Granted, these “misses” are generally very small and minute in relation to the overall frame, but to me they are still vitally important to reducing visual noise so the subject/story can shine through. So at some point during my processing, I’ll have to jump back in to clean-up mode and take care of a few items.
Example
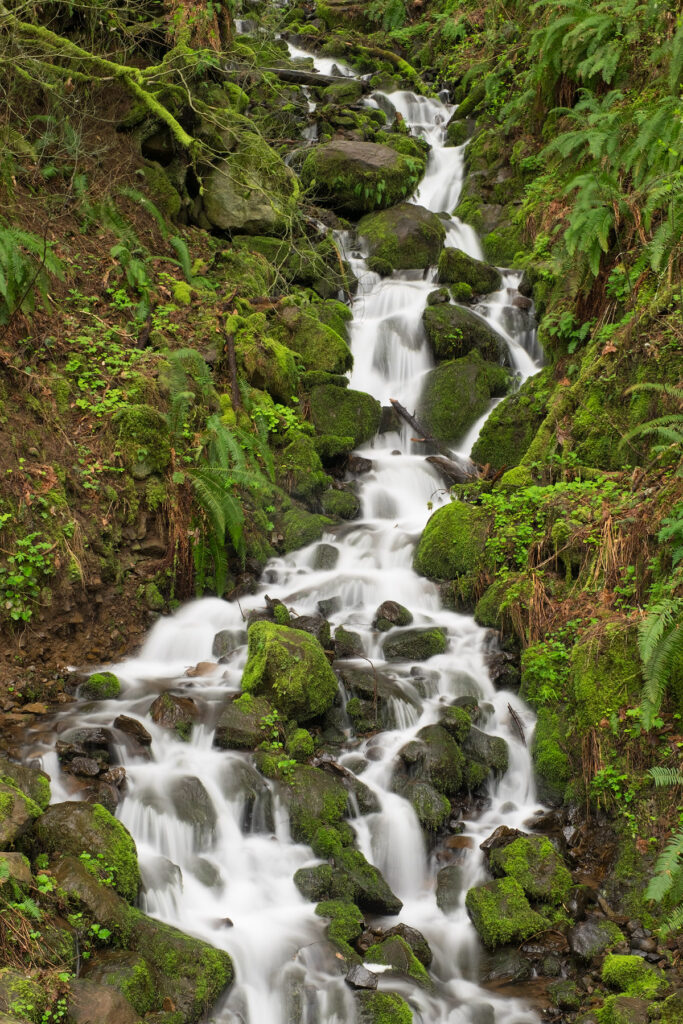
Let me show you what I’m talking about with an example from the Columbia River Gorge in Oregon. Anyone who has shot creeks or forests know how messy these can be, which means extra care should be taken in the field and then in the darkroom to do as much as possible to create quiet borders and let the subject really sing in the image.
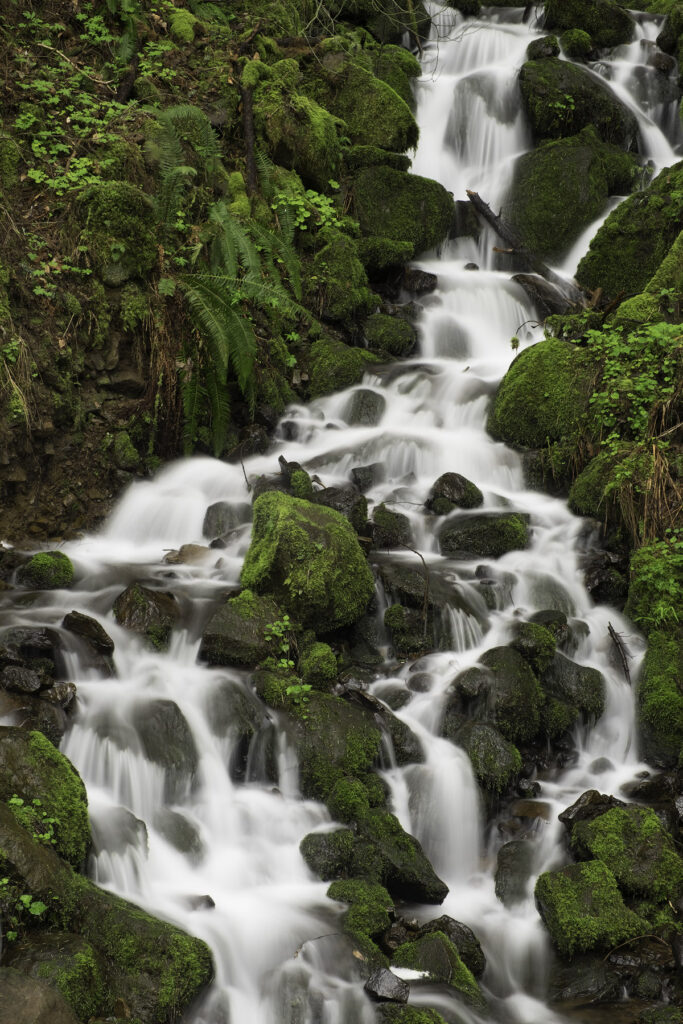
Here is the original composition. My goal was to highlight the flow of the stream across the rocks, the motion and the texture of the water, in the context of the forest.
Right away I identified some problem areas with the image, circled in red below

The fern on the right was moving in the wind. I couldn’t get a fast enough shutter speed to stop it’s motion, while still having the desired shutter speed for the water. Since the water is my subject here, its priorities superseded stopping the fern. The other big problem area is in the upper left, that big, BRIGHT stick protruding in to the frame. I knew just by looking at it that it would grab people attention away from the main area of the image, so I had to deal with it. Then, on the left, the messy hillside doesn’t add anything to the photograph or subject and because it is so busy, with lots of different tonalities, it has the chance to pull the viewer away from what I want them to see and feel.
In the field, I thought I could take care of the first two issues by re-framing my composition. The last issue, the messy hillside, I knew I had to deal with after the capture, in post processing. Here is the re-framed composition, un-edited. I changed focal length and tightened up the composition to remove the fern and bright log in the upper part of the image, while retaining the most important parts of the creek that I wanted to show.
Satisfied with what I could do in the field, I then moved on to other locations and waited to see what could be possible in Post to further sharpen the image to tell my story. Once I uploaded it to the computer and started taking a look at it, I realized that I had a lot of clean up to do to create quiet borders and highlight my subject. As you know, our eyes are drawn to the brightest parts of an image and in this case, the water is the brightest part of the image. You may think that since it is so bright, it will keep the viewers attention and I don’t have to worry as much about other things. Just because the water is the brightest, doesn’t mean that attention couldn’t get pulled away by other bright spots or incongruous items! Even in a shot like this with a bright subject, it is important to clean and quieten the image.
I have highlighted the areas in the image that I feel need attention. Again, for this article, after I had marked up this image, I kept finding more spots that I felt needed fixing and had to go back and re-edit the marked up image! There are even a few more spots I worked on in the final edited image that aren’t highlighted below.
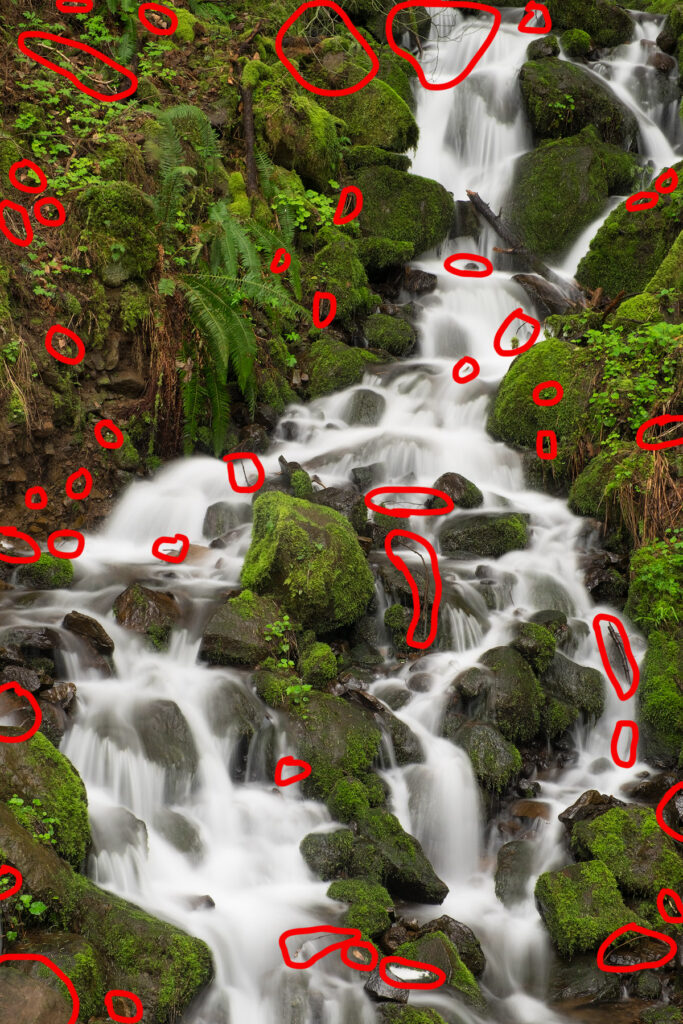
Look at all that red!!! Now you can understand a bit more how picky I am, for my own images, when it comes to cleaning up things that could distract from the story/feeling in the image. Notice that the majority of the areas are around the edges of the frame, the areas away from the main subject. This of course, is to try to create quiet borders so the viewer can focus on the main part of the image and have less chance of distraction by some errant bit of visual information. If you take a moment and study what I’ve circled above, you will see a mixture of types of fixes I’m targeting. I can group these in to categories; 1) obstructions 2) specular highlights (bright spots) and 3) tonality interruptions. Sticks and rocks are obvious obstructions that I clean up. These are the easy ones to identify and remove. Specular highlights are tougher to identify and ones that I’ve had to train myself to consistently see. I’m looking for any bright spots around the image that may grab the viewers attention. Leaves, pine needles, bare twigs that are bright, shiny parts of rocks, water reflections, etc…really anything bright that could grab attention. Lastly, the tonality interruptions…these are irregularities in any space of consistent tonality. Our eyes and brains are hardwired to spot differences in the landscape (fight or flight, food, etc) and we subconsciously notice any changes in tonality, even in a small creek scene. If you look above to the right side of the image, there is a moss covered rock. The whole rock is covered in moss and has a fairly even tonality across it’s surface. Now see that there is one light colored dot on the face of the rock which I’ve circled. This brighter dot, is not particularly bright to be a specular highlight, but it is a change in tonality on the rock that our brain will identify subconsciously and has a chance to draw our subconscious attention. By quieting this type of noise, I’ve hopefully freed a viewers brain to more fully focus on my subject or where I want them to look.
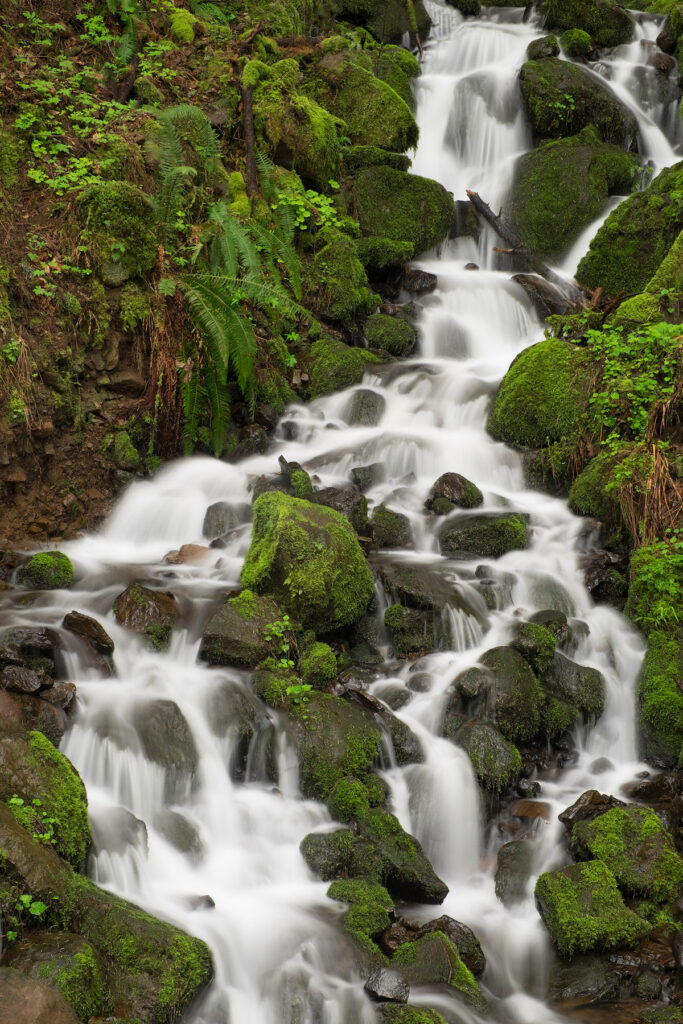
Here is the cleaned up version…I didn’t alter the essence of the image….but by removing the obstructions, highlights and tonal interruptions, I’ve quieted the overall image. Less visual noise. It is a subtle change and much of the effect will be on our sub-conscious mind. Consciously we see that the essence of the image is the same, no big changes. But underneath that initial read, you can sense a quieter image, tighter, less messy, etc. And since many of the issues were around the edges of the frame, I’ve created quiet borders in order to let the subject be seen and heard more clearly. Again, this image is un-processed other than the clean up work. Even now I can see other bright-ish spots that I could clean further if I wanted to!
Vignette to create quiet borders
The last step to create quiet borders is to apply a vignette to the image. This is something I do to every single image I publish! I have an entire blog post devoted to this. It does a couple of things for the image…by darkening the edges, the vignette further creates quiet borders, focusing and highlighting the center portion of the image. It also adds an increased sense of depth to the image. Moving from dark edges to light center, is a visual effect that imparts a sense of depth to our brains. For us landscape shooters, we are always trying to bring that real-world depth in to our 2D images, so vignette your images.
Here is the final processed image with some slight color tweaking, midtone contrast and tonality mask adjustments. Plus a subtle vignette.
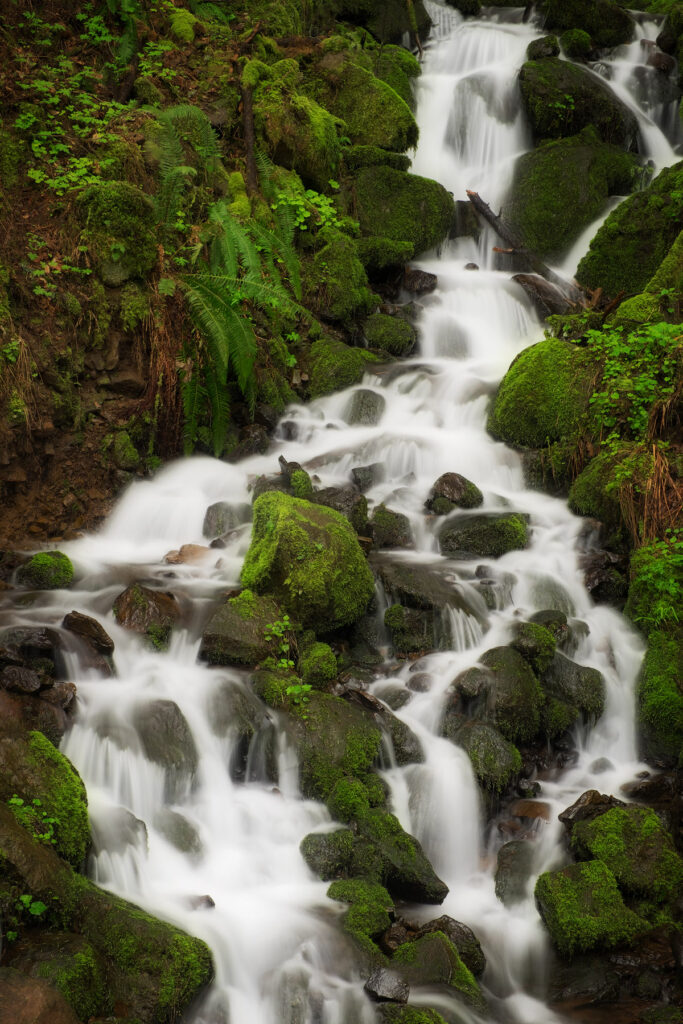
Looking at the final image, what quickly catches my eye is the small clump of brown grass on the right side of the frame. The right border is dominated by greens and this brown tone really stands out to my eye. Yes it is natural and it was there, but when I look away and glance back, my eye is momentarily drawn to the brown grass. It is something I might have to address in further edits. But overall, I’m very pleased with the image. The focus is on the flow, texture and shape of the water, while still being in a recognizable context of a lush green landscape. There is nothing that seems to distract or pull attention away from letting my eyes luxuriate in the crisp clean water (other than that darn brown grass).
Conclusion
Viewing my photography as a form of visual communication means that I need to carefully choose my “words” in the image in order to get my message across in a clear manner, hoping to connect with as wide an audience as possible, who all process information differently. And because I want the viewer to focus on the main story in the image, I need to be very careful about what other visual cues(words) are in the image. Do they support or detract from the story? Do they draw attention away from the main subject? Then I carefully work to remove, refine, enhance or subdue these bits of visual information until the story “reads” the way I want it to. To better focus the viewers attention on the subject, creating quiet borders can go a long way to keeping the viewers eyes where you want them as well responding to the other visual cues you have in the frame to point them in the right direction.


Leave A Comment