
I’m excited to write you to about the new Lightroom Denoise functionality that was just released this week in both Lightroom and Adobe Camera Raw. For many years I’ve not done the bulk of my editing in Lightroom, it was mainly a catalog tool and maybe a few global edits before I jumped in to Photoshop. But I gotta say, this latest release makes it even more attractive to stay in Lightroom for many of my edits, it’s getting that good.
Lightroom Denoise is available in version 12.3 and ACR 15.2. Check your Creative Cloud dashboard and choose to update your software. 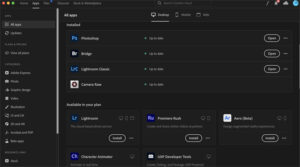 It is a relatively small update and will download quickly. The update is for both Windows and Mac and so far I haven’t heard of any issues with this installing automatically and running just as it should.
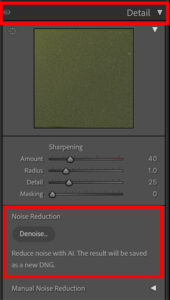 Once you update Lightroom, open it up and go to the Develop Module. Scroll down to the Details panel and open it up and you should see the new Lightroom Denoise button. The old denoise features are still available under the “manual noise reduction” option. This new Lightroom Denoise functionality is largely automatic. It is using intelligence to examine the photograph and identify all of the suspected noise in the image.
When you click the Denoise Button, the Enhance Panel appears. This is something you may be familiar with if you have ever used the Super Resolution function in Lightroom. When the panel opens, you will see a preview of the image with noise reduction applied. To toggle between noise reduction on/off, put your mouse cursor over the preview and hold the left mouse button. You will see the image change to the “before” look. When you release the button, you will see the “after”.
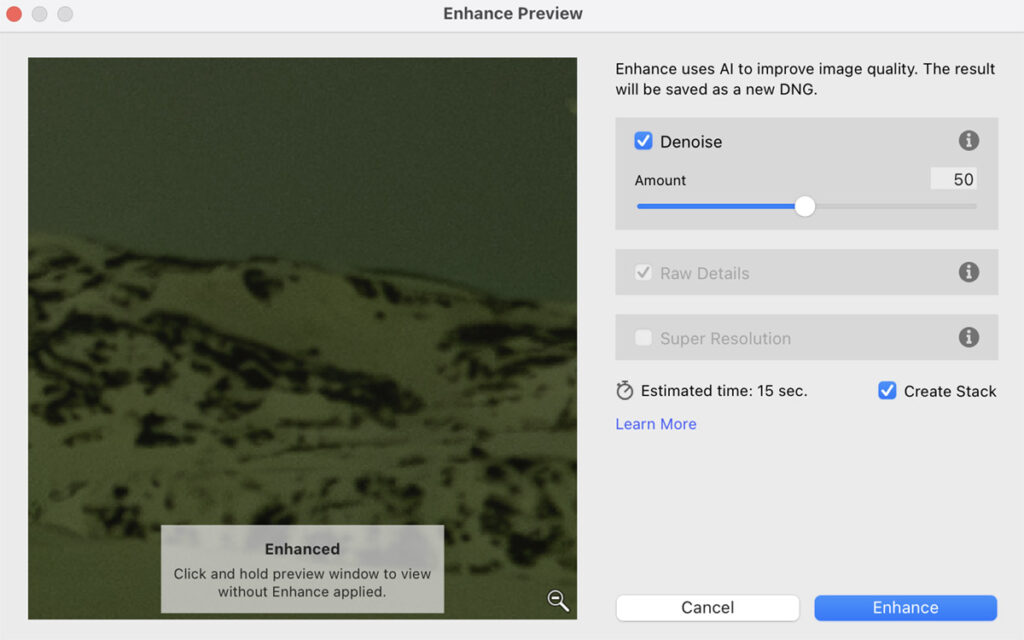
At this point, all you need to do is move the slider to choose the amount of noise reduction you want. Remember, the more noise reduction applied, the “softer” the image may appear. Noise reduction largely works by reducing contrast, particularly edge contrast, which is a big factor is how sharp an image appears. For now as I’m learning the strengths and weaknesses of the Lightroom Denoise, I’m sticking right around 50 on the slider. You may prefer a bit more or less, it’s best to experiment with this on your own images.
The other cool things in this panel are that it shows you the estimated time it will take to complete running the noise reduction step. This is largely dependent on how big your file is, and, how powerful your computer is. So far I haven’t exceeded 20 seconds! When I compare that time with the time it would take to open up my plug in, choose which NR model, then execute it, trust me it will take longer than 20 seconds. Most images have been running between 10-15 seconds.
Secondly, there is a selection box for you to choose whether to “Create Stack”. In Lightroom Denoise, when it run, it will create a duplicate copy of the base image with the noise reduction applied. It creates this copy as a .dng file. With Create Stack selected, it will stack the .dng file on top of the RAW file which helps in keeping everything organized. When it creates this copy, it also appends the file name of the copy. As an example, my RAW file with the noise reduction applied now has a file name of _DSF0247-Enhanced-NR.dng. It is very self explanatory which one has the noise reduction applied.
Now, not sure if you caught this above, but Lightroom Denoise only works on RAW files. It does not work on JPEGs. So, if you’re a .jpeg only shooter, I’m sorry but this won’t be available to you. Perhaps this is another reason to shoot RAW+JPEG in camera and then you can choose which file you need when you get home.
If you want to watch this functionality in action, I created a YouTube video for it below. If you’re not a subscriber to my YouTube channel, please consider subscribing. It really helps me continue making great content there!
Now comes the $64,000 question…will I quit using my current noise reduction plug-in in favor of Lightroom Denoise? To be honest, its too early to tell, I haven’t used this new feature enough. I love the results from my Topaz DeNoise program and it is entrenched in my workflow. I would never use the previous Lightroom noise reduction features, they were just too heavy handed and I was never satisfied with the outcome. But now…I am very encouraged by this new functionality. The removal of noise along with the preservation of details is close-to, or on par with, the Topaz products. Adobe did their homework with this one! I encourage you to try the new Lightroom Denoise and see for yourself. Let me know what you think!


Leave A Comment