Visual Inventory is Critical
One of my strongest pieces of advice to my clients and students is to take a visual inventory of your composition before you click the shutter button and then when you get in to the digital darkroom to develop your image. By looking at all of the parts and pieces of your composition before you take the image, you can possibly find flaws or areas for improvement and have the chance to recompose before clicking the shutter button. Then, when you get home and are wanting to process your image, before you begin any adjustments, it’s so important to complete a quick inventory of what you want to do and ultimately how you want the image to end up. As the old saying goes, if you don’t know your end goal, how do you know when you’ve reached it?
Before the Capture
Too often we are caught up in the moment of photography, amazed at the beauty we are photographing and just wanting to record the scene in all its grandeur. Sometimes though that excitement gets in the way of us critically evaluating our compositions before we press the shutter button. By all means YES enjoy and revel in the beauty that you are witnessing, but when it comes to creating compelling images, it’s important to execute your work with a more critical eye in order to come home with shots you are proud of. Ask yourself a few questions about your composition before you press the button….
- What is the subject of the composition and will it be evident to the viewer?
- What are the major elements in the scene and how do they “line up” or relate to one another? If I change the angle a bit does that change the relationship between the objects and change the “feel” of the image?
- Is the quality and direction of light “right” for the shot I want to take?
- Is there anything distracting along the edges of my frame? Can I move to eliminate them or will I have to do it in post?
- How do I envision the final image to look? Can I achieve that in post? Do I need to make adjustments to my camera or use filters or other tools in the field to achieve the final vision?
These are just a few of the questions I ask myself as I am composing my image and before I press the shutter button. Sometimes it’s a conscious exercise to run down a checklist like this, but sometimes it’s subconscious as I evaluate the scene and take a visual inventory. When I first started out it was a conscious effort for every shot, but as the years have passed its much more of an automated response/action in me as I’m photographing. The one thing I did though was commit myself to doing this for every picture until it became second nature. I encourage you to practice this and make it a regular behavior as you are out photographing.
Masters of the Darkroom
Most artists I’ve studied or known have a plan in their head for how they want the finished piece to come out. They can describe the final vision in clear words talking about composition, light/dark, colors, object relationships, etc. And, they typically have some sort of plan for how to get there. For photographers, because we cannot create what we want on the canvas like painters, we need to use what is given to us in a scene and have a clear idea of how we want the finished image to come out. This starts before capture and continues on in to the digital darkroom. Even Ansel Adams completed a visual inventory and a plan for how he wanted to develop an image. 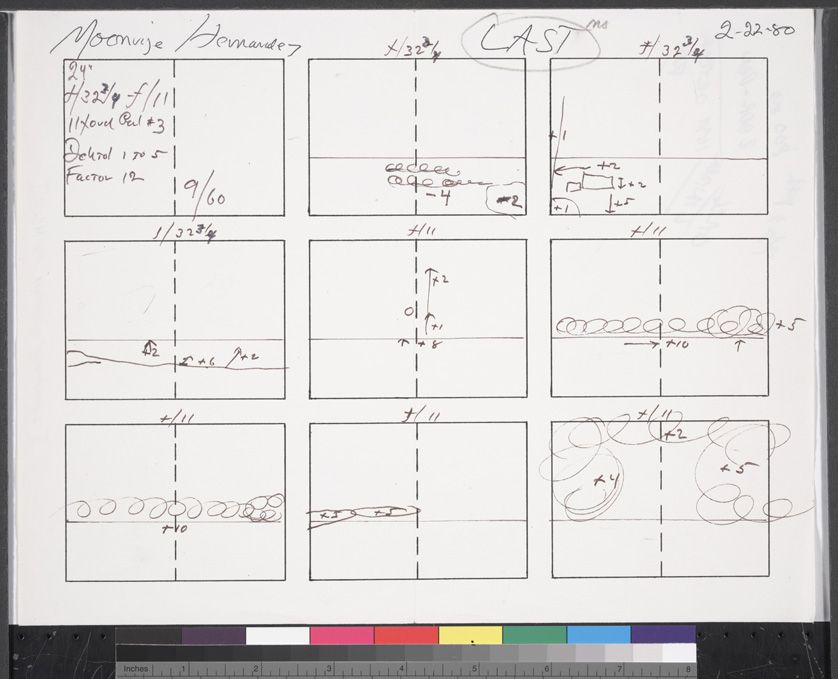
This is his actual notes for how he wanted to develop his famous shot Moonrise Hernandez. As you can see, he mapped out what he wanted to do to the image before he ever started the development process. It’s no different for us in the digital darkroom, mapping out what we want to do before we begin moving sliders in our editing applications.
Digital Darkroom
Once we get home and settled in front of our computer, we want to start developing our images in to our final vision for the shot so that we can enjoy it and share it. Great! But first, have you clearly outlined your vision for what the shot should look like? If you haven’t, how do you know what to do? One of the first things I do with people as I’m teaching post processing is to have them tell me, in regular words (not photo words) how they want the shot to look, areas that they are not happy with, etc. It’s the first step of a visual inventory and making a plan to edit the image. There are times that folks can’t articulate what the image is about, what the subject is or what emotion they hope to evoke or story to tell…..in these cases, my question is then, “why did you take the shot?” Hopefully there is a kernel of inspiration in there to form the foundation of how we want to edit the image and can base our visual inventory of edits from this.
When I take a shot, I have a pretty good idea of how I want the image to look when I’m finished in the darkroom. Things like…
- What story am I trying to tell
- Where do I want the viewers eyes to go in the image and how will they get there
- Color balance and overall tone of the image
- Do I want to evoke an emotion in the viewer and if so, what edits will I have to make
- Elements of the composition that I want to highlight
- What camera/physics limitations will I need to correct for in the darkroom
When I get the image back on to the computer and can really look at it, I’ll determine whether my initial vision for the shot can be achieved with the image file I captured. Sometimes seeing an image on a big screen (not camera LCD) the shot doesn’t seem to translate well and in this case I’ll change my approach and re-evaluate how I want the image to end up. But for the most part, I’m able to work with my original vision for a shot in the darkroom.
Now, before I start editing, I’ll do a visual inventory of my image and outline all of the edits I think I want to make. I won’t go to the trouble of writing it down, but if you’re just starting out doing this visual inventory thing, I recommend that you do write it down so you can stay true to your goal. Think about Global Edits first (white balance, cleaning up distracting elements) and then look at local edits to portion of the image or tonalities, then specific edits to small portions of the image, then any creative edits (filters) you want to put on, then any finishing touches. This is your visual inventory of things you want to do in basically the order in which you want to do them.
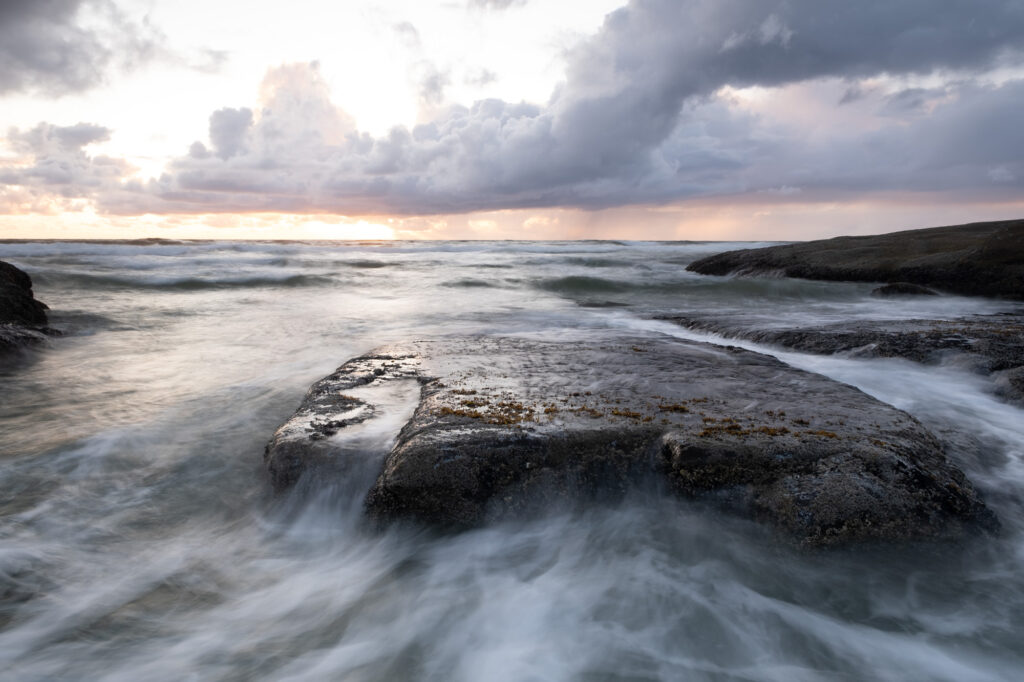
I’ll use a recent image as a quick example….here is the raw file from a recent shoot at the Oregon Coast. A storm had just passed through the area leaving some dramatic clouds during a beautiful sunset. This was taken just north of the town of Yachats along the 804 Trail. What the camera captured is not what was present (I needed more filters than what I had to knock back the light in the sky) so the sky is a bit brighter than I would have liked (I don’t normally bracket ocean wave shots)
Visual Inventory
To do a visual inventory, you need to look at the parts and pieces of an image and evaluate and assess each one. Then, look at all the parts and pieces as a whole in the image. Too often people just look at the whole image and don’t break it down in to it’s elements for editing purposes. AND, this is where you need to be hyper-critical of your work (always a good habit) and be honest with yourself of what works and what doesn’t in the image.
I spent maybe 5 minutes completing a basic visual inventory of the image and edits I want to make. See the notes on the image below…
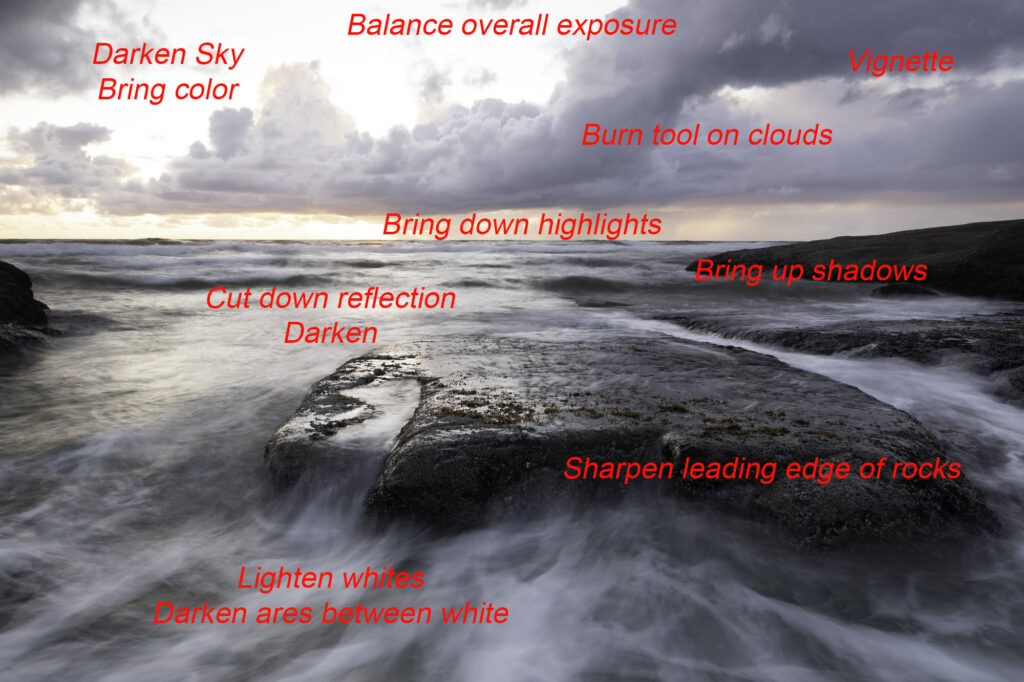
These are the basic high-level edits I want to make on the image in very simplistic terms. Within each one there are deep-dives into more nuanced edits, but you get the basic idea here. My goals for the image are to create more of a sunset feel, bring the drama back in to the sky, plus the color as well as accentuate the cool water motion happening with the large rock in the foreground. And I would like to minimize the mid-ground of the image because not much is happening there and it doesn’t add to the image. Here are some other thoughts that I want to convey in the image…
- Tie the drama of the ocean in the foreground to the drama in the sky
- Give a sense of the storm clouds passing
- Sunset and color to give some happiness to counter-balance the stormy feel
- The large rock is a big element in the image and I want the viewer to appreciate it, so I’ll make sure that it’s sharp and prominent (not darkened too much)
These are all things that I articulate to myself before I begin editing! Remember, if you don’t know where you’re going how do you know when you get there!
Finished Image
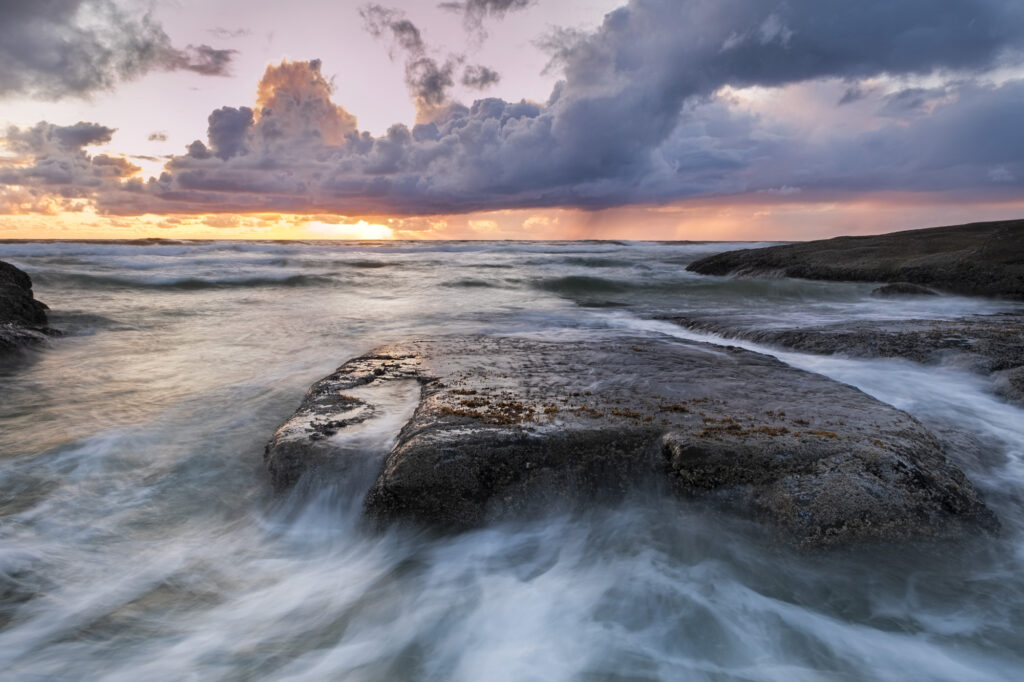
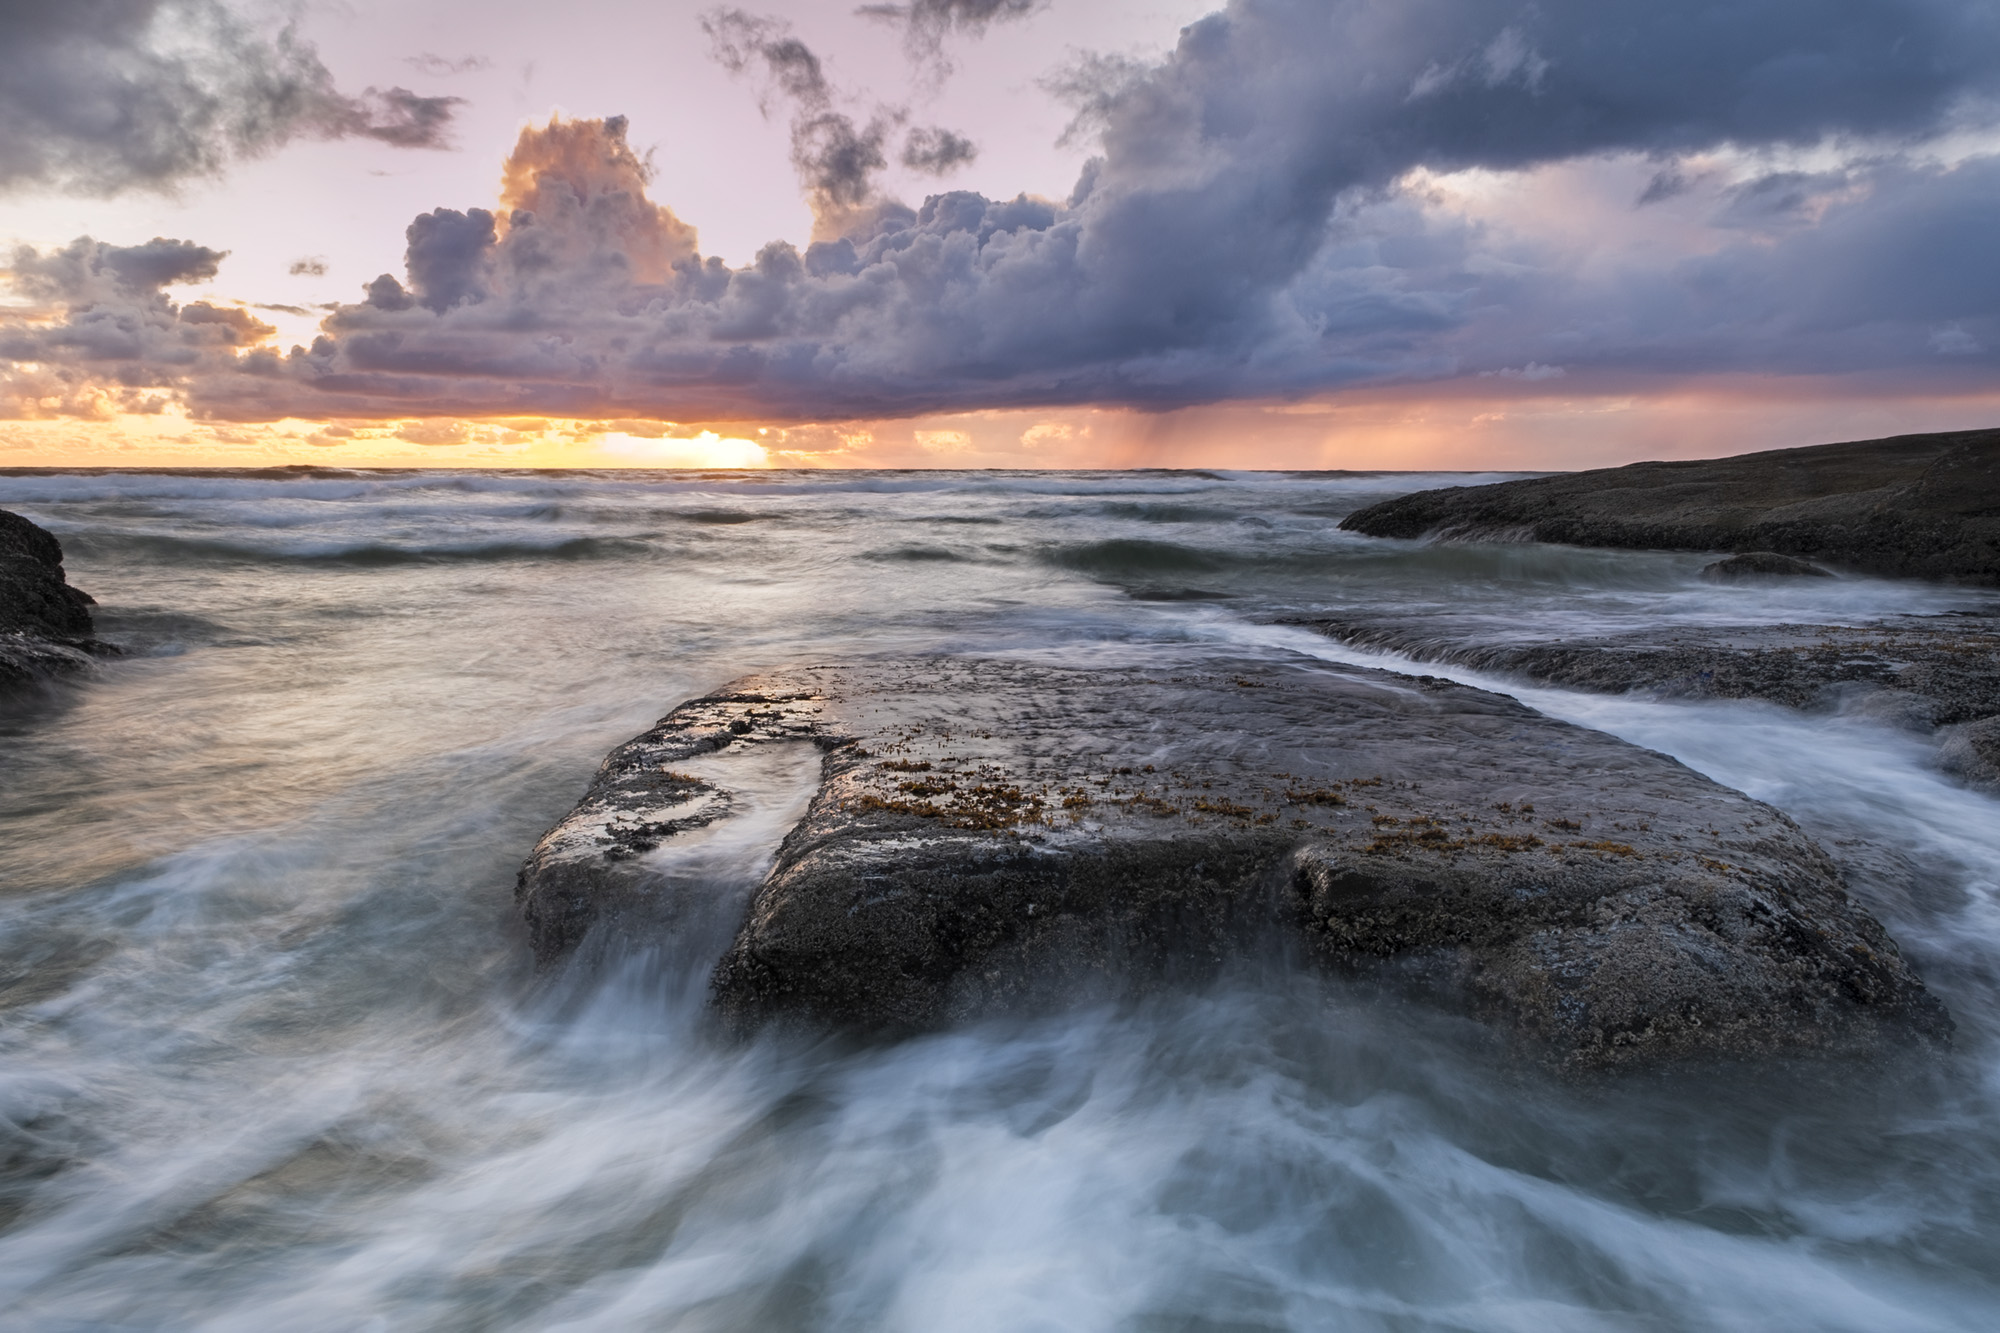
And this is how the final image looks. During editing, you may make alterations to the plan/vision as you make edits and re-assess the image and where it’s going. Sometimes I do “listen” to the image and let it guide how to edit, but most times I follow my visual inventory to get to my final vision. In this case, the image came out how I had envisioned it before I pressed the shutter button.
Conclusion
Creating art through photography is a moving experience and one often guided by the creative right brain which is more attuned to beauty, creativity and expressionism. However, to consistently create compelling images, you need to also engage your left brain and be a bit methodical about your composition and then your post processing. Taking a visual inventory of your comps before the shot and then before processing can help you achieve a clearer vision for your images which will translate to your viewers. If you have any questions about visual inventories, please reach out to me…I always love talking about this stuff!



Leave A Comment