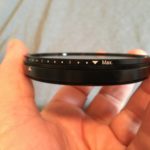
I recently made an addition to my photographic “toolbox” when my new Singh-Ray Vari-ND filter arrived. Over the years I have been constantly tweaking my tools and setup and this filter is something that I’ve had on my list for a while now to add to my gear.
If you haven’t heard of Singh-Ray before, they produce the finest filters for photographic use (IMO) Based out of Florida, they have been in business since 1962 and have collaborated with some of the photographic greats to produce a variety of filters for photography.
Why use a filter you ask? In this day and age of post processing and fantastic tools available in the digital realm, why lug around a bag of filters? Well, the answer is two-fold. 1) There are some things that you cannot do in post processing, such as blurring water or clouds. Yes you can add some “motion blur” in photoshop, but it doesn’t look realistic. and 2) getting the shot “right” in camera means that you have a better file to work with and you can spend less time in front of the computer “fixing” your image.
The Vario-ND filter is a Neutral Density filter that reduces the amount of light entering the camera, thereby allowing for longer shutter speeds. The longer shutter speeds is what produces the blurred effect in images. it is made with machined aluminum surrounding optically correct ND glass. Simply rotate the ring to provide between 2 and 8 stops of ND filtration. Dial it in to the exact density you want to produce the amount of motion blur that you are wanting for your composition. The filter is offered in a “regular” and “thin” version and the difference between the two is in the aluminum surround, one being thinner than the other. I chose the “thin” version because it reduces the possibility of vignetting when shooting wide angles. You may still get some vignetting when shooting ultra-wide, but this is the price to pay for putting filters on the end of a lens. Check out the Sing-Ray page HERE
In the past, I have carried a variety of different strength filters, everything from a 2-10 stop ND filter. In the field, this meant that I had to change filters when I wanted different densities of ND filtration. Now with this filter, I don’t have to change and can achieve almost everything that I want in the field. There may be some times when I want more ND filter, so I think I will keep my 10 stop and may add a 15 stop ND filter to my bag.
Living in the Pacific Northwest, I typically use an ND filter to blur water. I shoot a lot of streams and waterfalls and having that silky smooth effect is what I like. Also, I shoot a lot at the beach and blurring the water motion of the ocean can produce an ethereal effect for a more creative shot.
Having the right tools in your photographic toolbox, and knowing how to use them, will help you bring home more creative and inspiring images from your outings.
(originally published 2/16/16)


Leave A Comment