When I sit down to process an image in the digital darkroom, I make an initial decision of how I want the image to come out and then I create a recipe of the edits I need to make to achieve my final vision. As the old saying goes, if you don’t know where you’re going, how do you know if you get there? Having that end goal in mind and then a clear idea of the steps to get there is so important for staying true to your artistic vision.
For those that are old enough to have shot film and had a 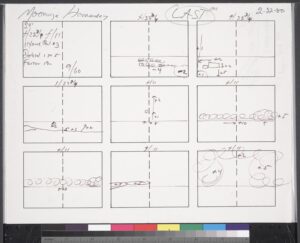 darkroom in their garage or bathroom, you might know what I’m talking about to create a recipe. In developing film, you needed to have an idea of what you wanted to do, and in what order, to properly develop the film to your liking. Even Ansel Adams created recipes for his darkroom work. Here are his developing notes for Moonrise Hernandez and you can see how he mapped out all of the edits.
The same philosophy holds true in the digital darkroom. It’s important to have a vision for how you want the final image to look as well as a plan for getting to that final vision. This is why I create a recipe. Each image I process is unique and I don’t apply the same edits to different images. Processing for each image is custom tailored to each specific image in order to realize my final vision. I don’t apply any packaged or custom presets, each image is bespoke in its processing. Even images from the same location typically get slightly different treatments. The light changes, my position changes and of course the subject may change…all meaning I may want to have a different vision for similar, yet different, images from the same location. A lot depends on my mood and the emotions I want to evoke in the image, which affect my vision for the image.
It’s important to evaluate each and every image and decide what you need to do for it to achieve its maximum potential. You don’t have to spend a lot of time processing images, some folks just don’t like doing this part of photography. Others do enjoy the processing part of photography, which is great too. For me, I fall somewhere in the middle. I know that to make a good image GREAT, I need  to apply edits to it and I try to do this in the most efficient and artistic way so that the viewer doesn’t consciously notice that the image has been processed. Adjusting tonality, guiding the viewers eyes, gently massaging color…these are all the things that I feel are important to making an image great. After all, our eyes and brain capture so much more information than our camera sensors do, so I try to bring back what I saw in my minds eye in a way that feels normal and natural.
Although I said I don’t apply any presets to an image, I do typically approach the edits for each image in a particular order. This is partly due to the tools I use and where I do my edits, but mostly it’s because there is a logical order to doing some of the work. For example, it doesn’t make sense to do fine color adjustments before I’ve done global white balance adjustments! In addition, some edits may have an effect on other previous edits, so I take care with the order in which I do my edits.
I did create a recipe, or an order of operation, for how I approach each image. Before I had written this down, I didn’t pay attention to the types of edits, nor, the order of operation. I started thinking about this a few years ago and was able to group the edits I typically make in to categories and then put them in an order that makes sense to me. Notice I said “to me”. These may not apply to you and how you prefer to edit or how you like your final image. I have done a lot of study of photographers I admire and how they process images and feel that my list is fairly complete and in a good order, enough so that I’ve been using this loosely for years. I do not do every step with every image! Sometimes an image just doesn’t need particular adjustments and so I may skip a step or two.
I usually start in Lightroom where I may do these steps
-
-
-
- Crop and straighten
- White balance adjustments
- Slight texture adjustment
-
-
Once I’m done in LR, I move to Photoshop where the majority of my edits take place. The first things I do are
-
-
- Noise reduction if needed
- Spot cleanup (this is critical for me to remove visual distractions so I can concentrate on tonalities and eye tracking through the image)
-
Here on out, I’m focused on the creative editing aspects, working on tonality, color, sharpness, guiding the viewer, etc.
-
-
- Exposure balancing (using tonality masks)
- Color
- Punch (midrange contrast)
- Light shaping to guide the viewers eyes
- Creative treatments (like Orton effect)
-
Once through these steps, I typically pause in my editing, clear my head and then take a look at the image with fresh eyes. I may need to revisit some of the edits above to keep on track with my vision. Once done with the creative edits, I move on to the final steps
-
-
- Selective Sharpening
- Vignette (I vignette every image. It helps to add depth to the image and direct the viewer)
- Save Master File (all files saved as .psd or .psb)
-
Once I’ve got the edited image saved, then I can progress to creating/saving copies for specific outputs. As you probably know, preparing an image for posting on social media is much different than preparing that file for print. Sizing, sharpening and color spaces are very different, so I create specific output files for each specific use.
 I find that making many small edits is less noticeable in the image, creating a more seamless overall editing palette. By creating a recipe, I know what edits I want to make to an image and therefore, how much and when to push an edit, or pull back. As an example, when I apply an Orton effect to an image, I know through experience that it changes the tonality of the image; darker darks and lighter lights. So in the Exposure Balancing section, I may not go as far knowing that when I apply Orton, I will need to revisit the overall tonal balance in the image and make further adjustments.

Leave A Comment