
A wide angle lens is a staple for most landscape and nature photographers and is often one of the first lenses folks pick up and start using. On the surface it is a fairly easy lens to use to create great sweeping landscape images. Because the lenses are wide, we are happy that we get so much in our shot and can show the beauty of nature in all it’s glory. At the beach, the mountains, rivers and waterfalls, we use the wide angle lens for just about everything. They are super easy to use because you don’t have to be too selective in the composition since the lens includes just about everything in its field of view. What’s not to love about wide angle lenses? They seem perfect.
The catch here is that as we progress as photographers, artists, storytellers and visual communicators, 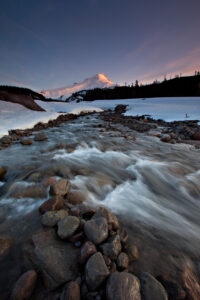 we may start to learn that wide angles lenses are actually quite difficult to use “right”. In fact, I’ll go so far as to say that my wide angle lenses (10-24mm, 16-55mm) are the hardest lenses to use in my bag and I need to really work hard to use them well when I choose to pull them out. By “right” and “hard”, those are the best words I can find to say that to really create a composition, to craft the image using a wide angle lens can be much more challenging because you simply have more field of view and more “stuff” in the shot that you need to deal with and manage to create a cohesive and compelling photograph.
For those that know me, you know that I talk a lot about separation, isolation and simplicity in photographs as a way to create stronger visual images or to communicate more clearly the message I’m trying to convey in my photos. I like clear subjects, lots of room to breathe with not a lot of visual noise throughout the image. This is almost the antithesis of a wide angle lens. Because of what I prefer, I often turn towards medium or long telephoto lenses to achieve the visual impact I am looking for in my photography. My choice in lenses really depends on the location, the conditions, the possible compositional elements and what it is that I’m trying to achieve. It really just depends on the “needs” as to which one I use. When I do bring out my wide angle lens, it’s because I have a specific need, such as accentuating a sweeping landscape, having a big foreground element with the background, or I just can’t fit the entire scene that I want to shoot in a telephoto lens. When that wide angle lens comes out, I slow down and make a point to remember certain principles that I have learned along the way related to wide angle lenses. This helps me craft the best possible composition and capturing it in camera while I’m in the field, no relying on post-processing/cropping to fix my sloppy field techniques.
I was recently asked to give a presentation on wide angle photography to a camera club in the Chicago area and I thought why not share some of the information in my presentation with you, my dear reader. I want to outline several pitfalls to using wide angle lenses to be aware of while you’re in the field, plus, several tips for more effective use of wide angle lenses. Just so we are all on the same page, wide angle is loosely defines as lenses ranging from 16mm-24mm. Ultra wide angle lenses are anything less than 16mm, which also includes fish-eye lenses. For the sake of this article, I will refer to both as “wide angle” (WA)
Challenges Using Wide Angle Lenses
Wide angle lenses can distort shapes and change perspectives
When using these lenses, it’s good to understand the effects a WA/UWA lens can have on the scene.  At the extremes, for example using a fish-eye lens, the entire frame can be warped and stretched. Using a more traditional lens, the edges of the frame can be stretched/warped to a degree. If the camera is not level, it’s pointing upwards or downwards, this can stretch the upper or lower portions of the scene. In addition, WA lenses typically increase the perceived distances between elements in the scene. To your eye, it may seem that distant mountains are bigger and closer, however when using a WA lens, those distant mountains may appear smaller and even more distant than with the naked eye. These effects aren’t “bad” per se, as they can create a feeling of more space, expansiveness, breadth, etc. However, if you want that distant mountain to be a prominent element in the scene, it might not using a WA lens. You do need to be aware of this in the field as you are composing your shot with a wide angle lens so you can achieve your desired creative end result.
Information Overload
 As I said above, WA lenses include a LOT of information in the scene. This can be a lot of information for a viewer to take in and for them to know where they are supposed to look. It is very easy to include too much information and overload the subject or story in the shot. There may simply be too much visual information for your subject to clearly stand out. Besides the viewer being overloaded, it can be very challenging for the photographer to deal with so many elements in the composition, to make sure they all compliment each other and the subject, plus scanning for unwanted elements creeping in the corners or in the middle of the frame.
As you are composing your shot it is important to recognize how much visual information is in the scene and have a plan to deal with all of that information in the field as well as in post to make sure your subject or story can be clearly understood. One of the most frequent questions I ask during image reviews is “what is the subject”? Typically because someone used a wide angle lens and wasn’t as thoughtful with how they managed all of the information in the scene.
The Subject Gets Lost
Because of the stretching of perspectives I mentioned above, it is easy for the subject to get lost in the wider scene. 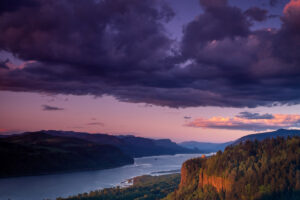 What appears large and close to our eyes may appear small and far away when seen through a WA lens. For example, this image of Vista House in the Columbia River Gorge. Of course the sky and the river are big important elements I wanted to include in the scene, which at first said to me that I should use a wider focal length lens. But what is also very nice is the warm light on the building in the lower right. If I as the photographer wanted my subject to be the building within the context of the beautiful landscape, I don’t think I succeeded. The building is way too small in the scene to have any visual importance. I would need to put on a longer lens, zoom in and make the building more prominent in the scene. If instead, my subject/intent was to capture the amazing landscape and sky that also happens to have the building in it, then yes, I think I succeeded.
Achieving Sharp Focus
 Because WA lenses can include the very near foreground, just a couple of feet away, all the way to extreme distances in the background, it’s important to acknowledge and deal with a potential loss of sharpness from the foreground to the back. Even if you stop down the lens to f/18 or f/20, oftentimes its just too much distance between the front and back in the scene and the physics of lenses simply can’t achieve sharp focus all the way through. This is a particularly important thing to remember in the field so you can compose the scene accordingly or take enough images to achieve the focus sharpness you want. There are two ways to overcome this…1) make a conscious creative choice that some part of the scene won’t be razor sharp. Our eyes and brain are programmed to “know” that distant objects won’t be razor sharp, so maybe you can concentrate on getting the foreground and mid ground sharp while letting the background stay “acceptably sharp”. Or, if you want to have the ultimate in sharpness throughout, then shooting a focus stack in the field and blending them in post will be your solution. Typically 3-5 images focused at different points in the scene can be enough to get sharp focus throughout the image.
Tips for Using Wide Angle Lenses
Here are some useful tips to remember when you are using a wide angle lens. These tips are relatively generic and apply to most scenes and subjects!
Have a Foreground Subject or Element of Interest
Having an interesting subject in the foreground provides visual interest and a grounding place for a  viewer to start their exploration of the scene. It helps to anchor the scene amidst a lot of visual information and could possibly be the main “subject” of your photograph. Having a clear foreground subject also helps to minimize distraction and wandering around visually untethered in the scene. Consider it a “starting point” for you and the viewers to jump off and explore.
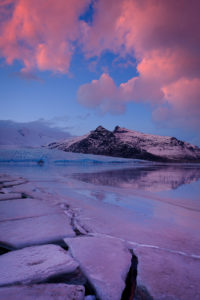
Get Low!!
Lowering your camera and tripod close to the ground helps to bring the immediate foreground in to visual prominence and helps to accentuate the subject in the foreground. Wide angle shots captured at head height lose some of the possible visual impact, so changing the perspective of the scene by lowering the camera can achieve some powerful effects. One thing to be aware of when getting low to the ground using a wide angle lens…you will most likely lose perspective on the mid-ground in the scene. Try this out next time you’re in the field and see what you think. Oftentimes shooting landscapes with a wide angle lens, the mid-ground isn’t that important and it is ok to visually minimize it by getting low. In this shot from the Oregon Coast, my camera was maybe 1 foot above the water because I wanted to accentuate the water motion in the foreground and have the sea stacks in the background.
Get Close!!
Get your camera and lens close to your foreground subject! Depending on the subject and your creative intent, you possibly may be as close as the minimum focusing distance of your lens! Close!!! Remember above, 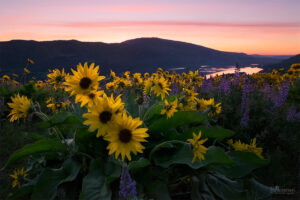 one of the challenges is that the subject can appear smaller in the frame when using wide angle lenses? Well, if you get close to your subject, you can overcome this tendency of WA lenses and make your subject appear large as well as making it very clear what the subject of the image is. In this shot of flowers during sunrise, the flowers are the subject so I got very very close to them to make them appear larger in the scene, being very overt exactly what the subject of the shot is.
Use Leading Lines
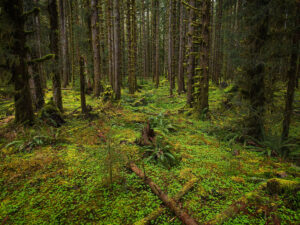
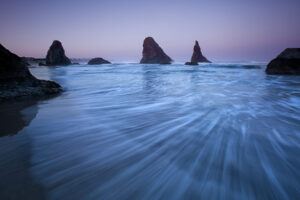
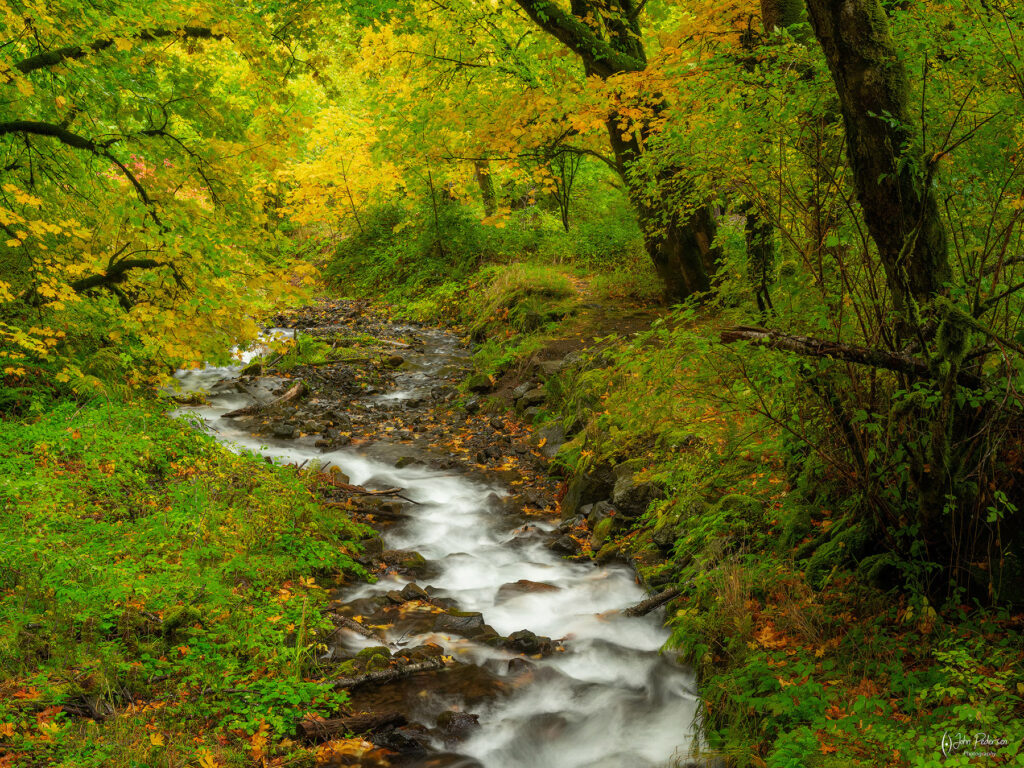
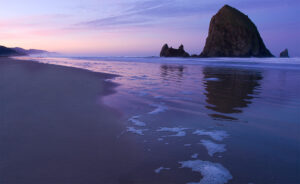 Instead of a strong foreground subject, you can also use leading lines to anchor and guide the viewer in to the wide angle scene. Just like a strong foreground subject, leading lines help the viewer to come back to something “known” if they get lost visually in the wide scene. Leading lines can be naturally occurring like the line of sea foam bubbles in this image of Haystack Rock. Or, you can use fallen logs, a forest path, or even a creek to achieve this effect.
Experiment
Experiment with tilting the camera slightly upwards or downwards, relative to the plane of the landscape. You can use the distortion effect I talked about earlier to emphasize, or stretch, certain parts of the scene to tell your story or highlight certain aspects of the scene. It’s a slight effect and mostly subconscious to the viewer so it won’t seem like trickery.
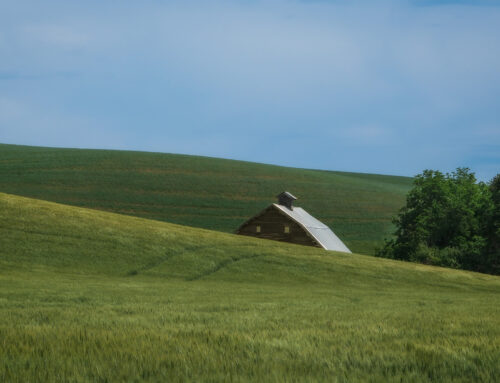
One example would be to tilt the camera slightly upwards which would “stretch” the sky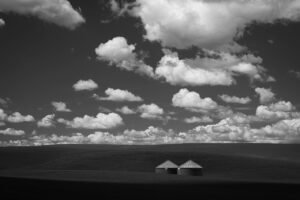 , emphasizing the vastness of it, making it more visually impactful in the photograph. For this shot of the silos in the Palouse, I used my wide angle lens and tilted it up slightly to emphasize the amazing sky we had in the Palouse. The sky is an important element in this scene and I wanted it to stand out in the photograph. It’s not the main subject, the silos are, but it is very important for what I wanted to do.
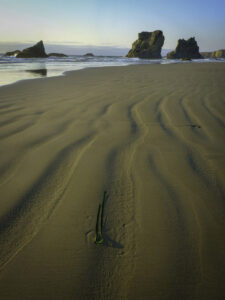 Another example would be to tilt the camera slightly downward, which would stretch and enlarge the foreground, emphasizing the subject or elements in the foreground. In this example on the left, I wanted to accentuate the lines in the sand (leading lines!) and so I positioned my camera low to the ground and then tilted it down slightly to enlarge the visual presence of the lines in the foreground.
Craft & Simplify
As I’ve said many times so far, using wide angle lenses introduces a lot of visual information in to the composition.  My recommendation for you is to slow down and really examine the scene through the viewfinder. It is up to you to “craft” the composition, ensuring that all of the information in the scene supports the subject/story and doesn’t distract from it. Identify all the major elements in the scene and evaluate their positioning, visual weight and whether or not they support the main subject. Look for elements or artifacts throughout the scene that may detract from the subject…things that may catch the viewers eye and distract them from the subject. Scan the edges of the frame looking for unwanted elements creeping in. Then, if you need to make changes, you can move your feet and reposition yourself so the elements line up better. Or perhaps you might need to change focal lengths to isolate your subject better and remove distracting elements from the scene.
Camera Orientations
Changing your camera from Landscape to Portrait orientation can have a profound impact on the composition, especially knowing the effects that a wide angle lens can introduce. I highly recommend you to experiment with different orientations in each scene and then when you get back home, see which one you like best. My general advice is that it depends on the subject and what you are trying to say in your image as to which orientation will be best. If you want to communicate and emphasize a broad expansive view, that often means shooting in a landscape orientation. If your subject is vertically oriented, or you want to include more of the sky above along with a near foreground subject, that often leads to shooting in the portrait orientation. You need to decide in the field which might be best based upon your intent and the subject. When in doubt, shoot both! The easiest way to do this is by having an L-Bracket on your camera. It is the one accessory that I always buy for each camera and is indispensable for my photography. Here is an example…

I first shot this scene in landscape orientation. I wanted to include some of the breadth of the landscape, plus as many of the lines in the sand as I could. When I reviewed the shot on my LCD screen, I felt it was a “nice” shot but didn’t really have the visceral impact I was feeling with the golden side light on the lines in the sand. So, without moving my tripod or ballhead, I flipped my camera to a vertical orientation and took the same photograph.

When I saw this on the LCD screen, I knew that this was the better orientation for this particular shot. It really emphasized the lines in the sand, made them more of an important visual element in the scene, which is what attracted me to this shot in the first place. It better takes advantage of the leading lines concept directing the viewer vertically in to the scene. Did you notice the seaweed and how it is also vertically oriented. Since this shot was about the lines, which are a vertical element, it made more sense to have my camera positioned vertically. The camera position is in harmony with my subject which resulted in a stronger photograph.
Slow Down
When shooting with wide angle lenses it is important that you slow down your thinking and actions in the field. Using WA lenses is challenging, much more difficult to do it “right” than telephoto lenses. You need to give yourself time to think about what you’re doing and recognize the challenges inherent in these lenses. There is so much information in each scene for you as the artist to process, it takes time to recognize and consider all of the information that your camera will capture. Slowing down helps you consider all of this and allows you the freedom to think about the end result and if that will achieve what you’re going for. Slowing down allows you to think through each step and then possibly re-position yourself or even choose a different lens to achieve your creative vision.
Conclusion
At this point you may be thinking that wide angle lenses are too much work or have too many challenges….well, yes and no. They do require more work than telephoto lenses and they do have some inherent challenges, but those shouldn’t deter you from using your wide angle lens. In fact, some of the most impactful and awe inspiring photographs are shot with wide angle lenses, so the juice is definitely worth the squeeze. It’s important for you to slow down and remember the plusses and minuses of WA lenses when you are out shooting so you can adjust and compensate to achieve your creative vision. Let me leave you with these four points…
- Know when, and when not, to use a wide angle lens, based on your creative vision and what is most conducive to the subject or story
- Just because you CAN fit the whole scene in to your composition, doesn’t mean you SHOULD, or that it will create a strong image
- Have a strong focal point or subject in the foreground. Get low and close to it.
- Work to arrange all of the elements in the scene so that the compliment each other and don’t detract from the subject


Leave A Comment